
Siege of Hive Hyperia Campaign
Two day Warhammer 40K Narrative Campaign Rules!
The following outlines the two-day Campaign I ran/attended at Hobby Haven in Worcestershire, UK. You can read the outcome in The Siege of Hive Hyperia and The Final Siege of Hive Hyperia. You can get 10% off your stay using the voucher code CADIA at Hobby Haven.
Never miss an article? Subscribe!
Regional Overview
This Campaign occurs on Vigilus, the critical fortress world of the Nachmund Gauntlet, specifically Hive Hyperia.
Abbadon’s forces have ravaged Vigilus for many months with the Black Legion and other Traitor forces. But, through the pure will of the Emperor and his loyal subjects – Vigilus still stands!
All be it in isolated pockets with limited supplies and communications facilities.
Hive Hyperia Overview
Hive Hyperia is one such isolated pocket. Cut off from her neighbouring hives, Hyperia stands alone against a new foe to enter the conflict. Abbadon has withdrawn his forces from Hyperia – bored of the slow progress being made – giving its people hope that they will soon be able to reach another hive or an orbiting Imperial vessel.
The Red Corsairs have been dispatched by Abbadon to quickly and brutally finish Hyperia and bring it under control. The Iron Hands of the Brutus Cruiser assist the Red Corsairs on their bloody mission. Through either psychic manipulation or covert operations, the forces of Chaos have managed to sway the crew and the Iron Hands onboard the Brutus to their ruinous cause.
Hyperia, battered and bruised from defending itself against the Black Legion, is ill-equipped to deal with the forces about to assault their walls. However, the Cadians and Blood Angels must try their best, as help is far off.
The Siege of Hive Hyperia
The Ruinous forces must attack and take the Saint Haven Palace by first attacking and taking the outer areas of the Hive and then working their way into the centre of the hive to take the palace.
As Abbadon found, this was no easy task; the outer defences have been worn down and may break once pressure is applied. As the hive falls and the defenders become more desperate, the forces of Chaos will have to choose their plan of attack wisely to ensure they can reach the palace and have the necessary support to break any Imperial forces making a final stand.
Pre-Campaign Tasks
Choose your Faction. For the narrative to work, this must remain the same for the weekend. This includes any Successor Chapter abilities etc. You can’t play Grey Knights from one particular Brotherhood and then change it mid-campaign.
Name your forces to give the narrative context and add to the fluff.
- Lance – Blood Angels – The Day of Absolution
- Jake – Astra Militarum – Cadian 93rd
- Simon – Iron Hands – Ghosts of Atlas
- Olly – Red Corsairs –
The above allocation will be your primary force for the campaign. However, if you have other small armies and wish to deploy one in a narrative-side game context, feel free to bring this as well.
Pick a general. This individual can be cannon or one you’ve made up. He doesn’t have to be fielded in every game, if at all. He might be commanding a more significant battle from a command centre or only commit to critical missions or battlefronts when needed.
Campaign Rules & Matches
Named Characters
If a Named Character or your Army General is destroyed during a battle, they must skip the next battle. They have not succumbed to their wounds; they need some time away from the frontline to rest, recover and repair their war gear.
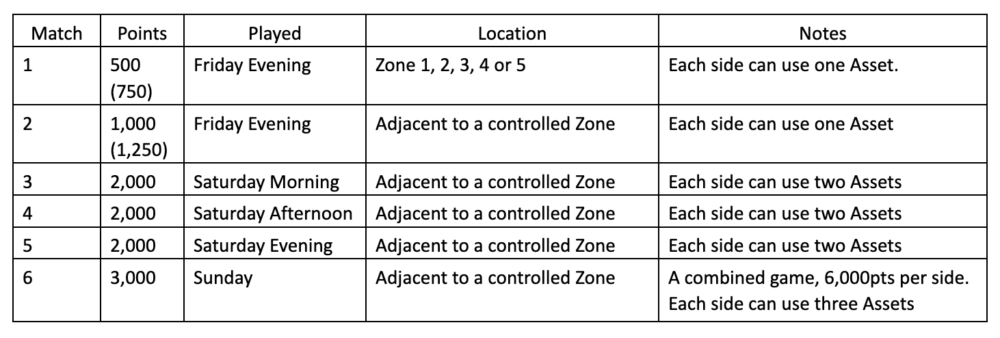
500 & 1,000 pts Games
These two opening games see the forces of Chaos assault the outer portions of the hive so relentlessly that the Imperial forces within have little to no hope of repelling the attackers.
Missions
- The Imperial forces win if they have at least one model left on the battlefield at the end of Turn 5.
- The Chaos forces win if all Imperial models are destroyed before the end of Turn 5.
- There is no draw condition.
Battlefields
The players can set up the battlefield terrain as they see fit for the Zone being fought over. Because the forces of Chaos are at a points advantage (see Voidborn Assault below), the battlefields should reflect the defensive positions the Imperium is taking against such overwhelming attacking forces.
Detachments
Use any detachment you see fit to build the force you wish to bring.
Command Points
- 500 pts game – start on 3CP
1,000 pts game – start on 5CP
2,000 pts Games
The fighting is now well underway within the hive’s walls. These battles allow the Chaos forces to try and take Zones – and Assets within those Zones – for use in the final battle. The Attackers must also try and cut a path through the various Zones of the hive to ensure they can access the palace for the final battle.
The first games were set to allow the Chaos forces to break into the hive city and establish a foothold. Now that both factions can access local Assets in Hyperia, each side will b able to put up a good fight for the Zones within the hive’s walls.
The Defenders are attempting to stop the traitors from gaining access to key Assets.
The Attackers are clearing a path and grabbing what Assets they can to assist them in the grand finale at the hive’s palace.
Missions
Any Strike Force Arks of Omen mission – select a mission that fits the Zone being fought over. Use the Secondary Objectives as usual from the Arks of Omen book.
Battlefields
The terrain should give a fair fight and represent the Zone being fought over.
Detachments
Use a single Arks of Omen Detachment. A Patrol Detachment may be brought for no CP cost.
Command Points
Start on 6 Command Points as per the Arks of Omen book.
6,000 pts Game
In this final battle to decide the campaign, the Imperial forces must hold the Saint Haven Palace.
Mission
- The Imperials win the campaign if they hold the Objective Marker at the end of Turn 5.
- The forces of Chaos win the campaign if they hold the Objective Marker at the end of Turn 5.
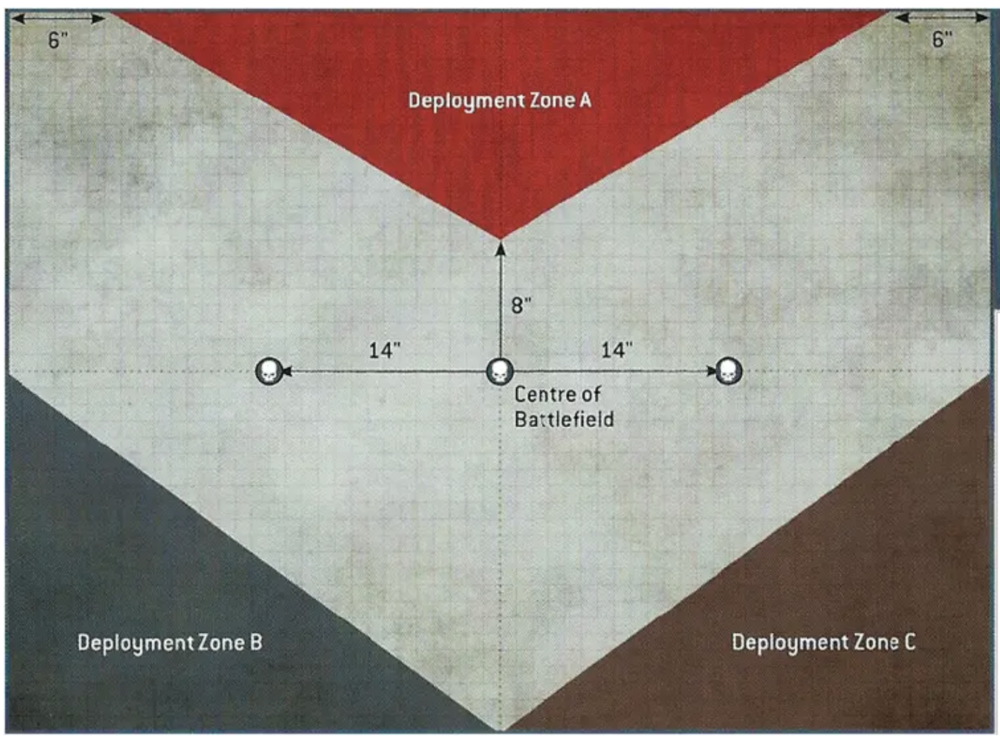
Battlefield
The Imperial forces are defending a vast palace.
Create the battlefield to represent this palace with at least two outer layers of defences; walls, buildings, bunkers, debris, etc.
The following map is an example of the deployment areas used for this final battle – adjust measurements accordingly so that forces are deployed 24” from each other. One Objective Marker is placed in Deployment Zone A.
Imperial Morale tests auto-pass during this battle – No Retreat!
Detachments
Use any single detachment or a combination of any two detachments. You may duplicate detachments.
Command Points
Start on 9 Command Points.
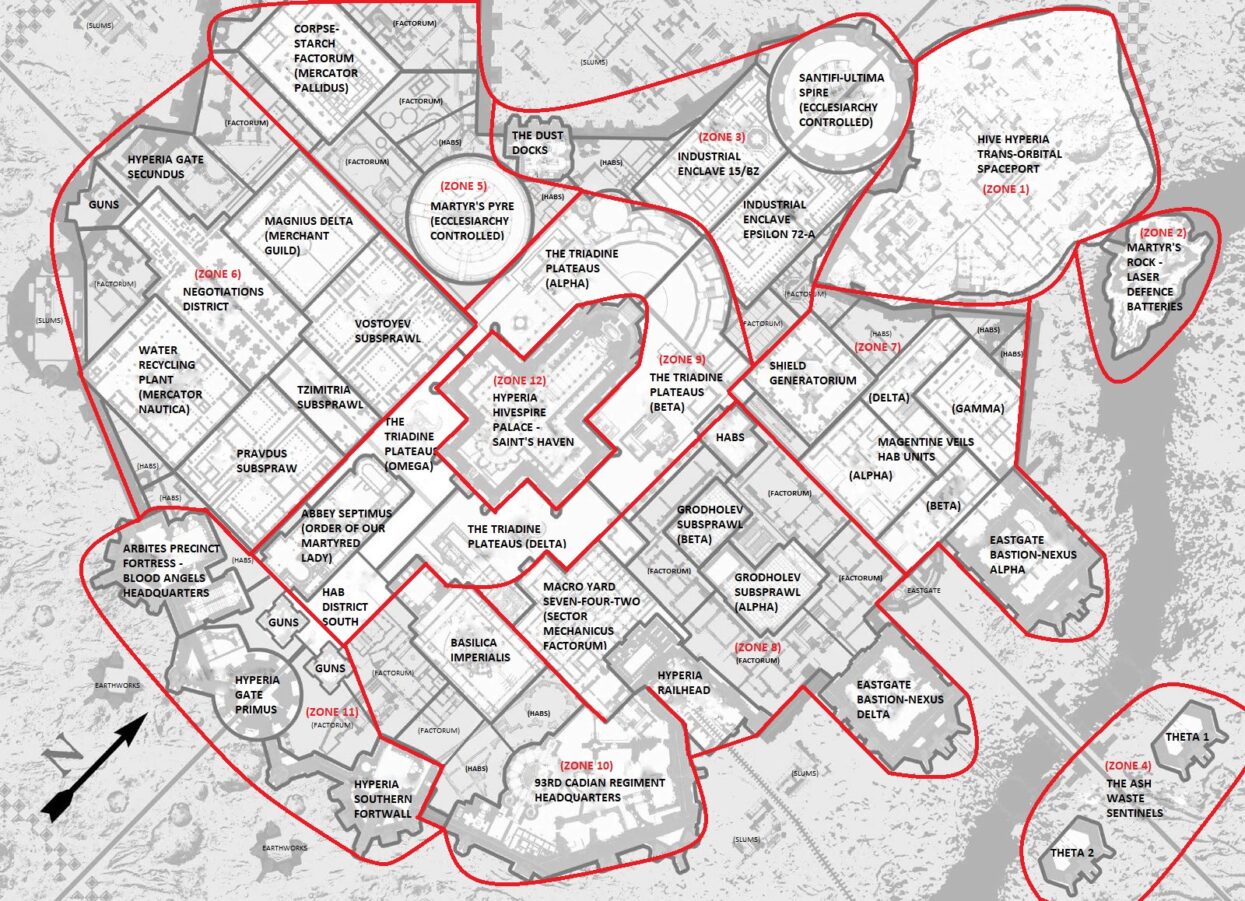
Zones
The Hive Hyperia map is split into 12 Zones. Each Zone contains one or more Assets.
Players who control a Zone may use Assets from those controlled Zones. The number of available Assets depends on the game’s size; see above.
The Red Corsairs and Iron Hands start their assault with just the Brutus and The Dulled Blade Assets. See below.
The Cadians and Blood Angels start with all the Zones in their control.
Either player of each faction may use Assets. E.g. the Imperial forces hold Zone 9, which contains the Abbey Septimus (Medicae Facility), then either the Cadians or Blood Angels can use this Asset in a game. Still, both cannot use it simultaneously during the same round.
Once the forces of Chaos have taken a Zone, the Imperial forces cannot fight to reclaim a lost Zone. They can only defend and hold Zones, stopping the enemy from taking them.
Voidborn Assault
Assets:
- Space – Brutus
- Space – The Dulled Blade
This Asset represents the sudden and furious initial attack from the Iron Hand’s Cruiser (Brutus) and the Battleship of the Red Corsairs (The Dulled Blade).
It allows these forces to field 250 extra points if they hold one or fewer Zones on Vigilus.
Medicae Facility
Assets:
- Zone 9 – Abbey Septimus (Order of our Martyred Lady)
Rejuvenate facilities and the medical facilities of the Adeptus Soritoras stand by to heal the wounded, replace lost limbs and implant cybernetics. Were this place of sanctity fall into the hands of the Heretics?
Benefit: If a Troop unit is below full strength, regain 1D6 models.
When: Your Command Phase.
Applies: 1 Troop Choice.
Limit: 1 use per battle.
The Might of the Adeptus Mechanicus
Assets:
- Zone 3 – Industrial Enclaves 15/BZ and Epsilon 72A
- Zone 8 – Macro Yard Seven-Four-Two
The technological might of the Adeptus Mechanicus is at your disposal, be that by the light of the Omnisiah or a twisted parody corrupted by the Dark Mechanicum.
Benefit: Regain 1D6 wounds to 1 Vehicle or Monster of your choice.
When: Your Command Phase.
Applies: Vehicle or Monster Unit.
Limit: 1 use per battle.
Command and Control Centre
Assets:
- Zone 3 – Hyperia Hivespire
- Zone 2 – Martyr’s Rock Laser Defence Batteries (Heretic Forces Only)
- Zone 10 – 93rd Cadian Regiment Headquarters
- Zone 11 – Arbites Precinct Fortress
- Zone 12 – Palace “Saints Haven”
Commanding the entire sector from the central dias, the general oversees all. Information is relayed back to Command from the front line, and reinforcements are redirected quickly. Hundreds of personnel move between tactical relay stations. Artillery and close air support are given fire missions.
Benefit: At the start of each Command Phase, as long as your Warlord is on the battlefield, roll a D6. On a 4+, you gain an additional CP. This is in addition to the usual limit of 1 CP gain.
When: Your Command Phase.
Limit: Your Warlord must be present on the battlefield.
Fire Support
Assets:
- Zone 4 – Ash Waste Sentinals
- Zone 7 – Eastgate Bastion-Nexus Alpha
- Zone 8 – Eastgate Bastion-Nexus Delta
- Zone 11 – Hyperia Southern Fortwall
Hive defence platforms under the control of your forces are called in to provide accurate, close-range fire to support your troops on the ground!
Benefit: A single unit may Overwatch on a 5+. This ability still costs 1CP.
When: When targeted in the Charge Phase.
Who: Charged unit.
Limit: 1 use per battle.
Special: You may still use the Core Overwatch Strategem, but it must be used on a different unit.
Astropathic Relay
Assets:
- Zone 10 – Basilica Imperalis
Whilst its primary objective is to relay messages across the vast distance of space, the Astropathic Choir is a vast resource of psychically attuned power which can lend aid to or be corrupted by whomever rules as overlord.
Benefit: 1 Psyker from your army gains + 1 to their Psychic Tests and Deny the Witch Tests. However, there is a downside. Such sheer untapped power is hard to control; if a unit suffers the Perils of the War, the unit takes four mortal wounds.
Who: Pysker Unit
When: Physic Phase
Mobile Shield Unit
Assets:
- Zone 7 – Shield Generatorium
The Shield Generatorium of Hive Hyperia has long been dead. Its powerful void shields were destroyed in Abbadon’s first assault. The area does still contain several mobile shield-gen units, though.
Benefit: The selected unit gains a 4+ Invulnerable Save until the start of your next Command Phase, at which point the Mobile Shiled Unit’s power starts to deplete, and the Invulnerable Save changes to a 5+ until the next Command Phase, after which the effects are lost.
Who: Any of your army’s units.
When: Your Command Phase.
Limit: 1 use per battle. It cannot be used on Titanic units.
Rapid Insertion
Assets:
- Zone 1 – Hive Hyperia Trans-Orbital Spaceport
The spaceport of Hyperia was once a bustling trade hub for locals and off-worlders to buy and sell all commodities. Now it is a barren plain of burnt-out ground vehicles and spacecraft. But, not all the flying vessels are damaged… one remains.
Benefit: The selected unit may Deep Strike onto the battlefield at the end of any of your Movement Phases, even the first 9” away from enemy models and the enemy Deployment Zone.
Who: 1 friendly Infantry, Beast, Bike or Cavalry unit.
When: Before the game begins.
Wargear Stash
Assets:
- Zone 6 – Magnius Delta
The Magnius Delta Merchant Guild still has scraps of cargo containers left from the old days of Hive Hyperia. Such caches of wargear can be used to upgrade and outfit a host of loyal warriors and traitors.
Benefit: This unit may take any wargear options that usually cost points; for free.
Who: 1 friendly Infantry, Beast, Bike or Cavalry unit.
When: Before the game begins.
Hydro-Homies
Assets:
- Zone 6 – Water Recycling Plant
“A refreshed mind is a stable mind.”
- Grand Inquisitor Trax of Vigilus
The Water Recycling Plant of Hyperia could be just the weapon a Commander needs to turn the tide of a battle. Just how a Commander uses such a resource depends on their allegiances.
Loyalist Benefit: All Troop choices add 1 to their Movement Characteristic, 1 to Charge, and 1 to Advance rolls.
Loyalist When: Before a game begins.
Loyalist Limit: This benefit cannot be used in consecutive games or during any battle fought within Zone 6.
Chaos Action: The Ruinous Powers attempt to divert the remaining water on Hyperia to destroy an enemy-held Asset. Select an enemy Asset inside an enemy Zone and roll a D6;
- 1: nothing happens.
- 2-5: the enemy Asset cannot be used until the final battle.
- 6: the enemy Asset is destroyed and can never be used again.
Chaos When: The above action must be taken when the Chaos forces take Zone 6, which contains the Water Recycling Plant.
Too Many Bodies
Assets:
- Zone 5 – Corpse Starch Factorium
- Zone 7 – Magentine Veils Hab Units
- Zone 8 – Grodholev Subsprawl
Abbadon heavily bombarded some areas of Hive Hyperia, and then they were invaded by warp-born Demons. The dead left at these locations is hard for the human mind to comprehend and brings joy to the minds of others.
Loyalist Benefit: Such is the destruction, blood and gore in these areas; it brings the light of the Emperor into any loyalist, guiding them on their journey to avenge the brutalised. Add 1 to all Leadership values.
Loyalist Who: All units.
Loyalist When: The duration of the battle.
Chaos Benefit: The Chaos Gods, and their lackeys, look upon these areas with crazed joy. Add 1 to all Psychic Tests.
Chaos Who: All Psykers.
Chaos When: The duration of the battle.
A Guiding Light
Assets:
- Zone 5 – Martyr’s Pyre
Even in this gravest of hours, an eternal flame still burns for the Emperor. It illuminates all, psychically and spiritually. The flame has burned for as long as any citizen has lived on Viligus, and it should continue to be that way.
Benefit: Improve the unit’s WS and BS by 1, until the start of your next Shooting Phase.
Who: Any friendly unit.
When: During your Shooting Phase.
Limit: 1 use per battle.
Benefit Alternative: If a Chaos army wishes to use this Asset, they can, at any point during one of their Shooting Phases (as long as they have not used the above effect in this Shooting Phase) extinguish the eternal flame at the Martyr’s Pyre. After this happens, neither Benefit can be used again by either side – but for the duration of the battle in which the flame was extinguished, all loyalist units reduce their Leadership by 2. This effect occurs immediately across all games, even on other battlefields with other players.
Faith is the Soul of an Army
Assets:
- Zone 9 – The Triadine Plateaus
The Triadine Plateaus is the area around the palace; it serves as a defensive bulwark and as an inspirational space for the faithful of Hyperia. There is little that a man’s mind cannot believe to be true when standing in The Triadine Plateaus. This is the closest any regular citizen of the Imperium can hope to be to a Hive palace.
Benefit: Morale tests are automatically passed, and all units have a Leadership of 10 for any other Leadership-based test.
Who: All loyalists units.
When: The duration of the battle.
Limit: Loyalist forces may only use this Asset when defending Zone 9. It cannot be used in any other battle.