
Tau vs Imperial Guard Battle Report – 1,000pt
First game on the new board! Its Tau vs Imperial Guard again, 1,000 points.
This is my first battle report of any sort, so this will be a learning exercise for me and if you have comments please post away or Tweet.
This blog is about me learning at the moment. I’m not a greatly experienced player – so please speak up and help me learn! By writing this down I can hope to learn from my mistakes more quickly and not repeat them again and again.

Deployment, Imperial Guard would deploy left, Tau right.
I have only played against Tau so far during my time getting back into 40k, since Jan 2014. So I haven’t yet felt the relentless charge of an Ork or Tyranid horde. The battles have been interesting though as both our armies are rather static and shooty. Although Tau seem to do this much better than my Imperial Guard.
It turns out that this might be a long article, is it too long? What is too detailed? What have I missed?
So here goes my first Tau vs Imperial Guard Battle Report
Imperial Guard Army
I went for a fairly mechanised list, basilisk, russ, heavy weapons team with mortars, blob of 20 guardsmen plus commissar, platoon and company commander. I had Marbo and two chimeras with veterans in reserve. Veterans had no doctrines but both had two melta guns and a plasma gun.
I didn’t take anything fancy with my commanders and blob, no specials, no plasma pistols and no power weapons. They did have a vox each to help with orders. My idea here was to not have my guardsmen (with BS3) use special weapons as they will simply miss 50% of the time, its simply a waste of points. I had once used flamers with guardsmen but they got killed before they got close enough to anything.
Tau Army
The Tau army will get no coverage, they are an enemy force and deserve no attention. Anyway the enemy force is inconsequential, enemies of the Imperium will be crushed, maybe not in this battle or the next, but they will be crushed under the weight of millions of guardsmen boots.
Prelude
Mission: Emperor’s Will
We placed terrain on the lovely new 6ft x 4ft board. It worked really well, only one additional piece of Gorilla Tape was needed to secure one end. This stopped the boards from moving so freely.
I deployed my Imperial Guard first, Tau second. My deployment strategy was to give my basilisk and mortars a good field of view, while I did do this, I did it too well. I placed my blob in a forest for some cover, my platoon commander went into the same forest (it was a big forest) and my company commander went into a forest too, on top of my objective. The russ went into the centre using solid terrain to protect one flank, the only unit of the Tau’s able to glance or penetrate the front armour of the russ is the broadside with twin linked heavy railgun.
Its worth noting that terrain placement and objective placement was done according to the rules. But the rules are new to me and my opponent. So if you spot something wrong in this report or in any images please let me know!
Each of us placed a primary objective in our own table half, both of us opted to place our objective just on the deployment line on or near cover. In the photos the objects are up turned blue plastic milk tops.
Tau stole the initiative. Nooooooo!
Turn 1

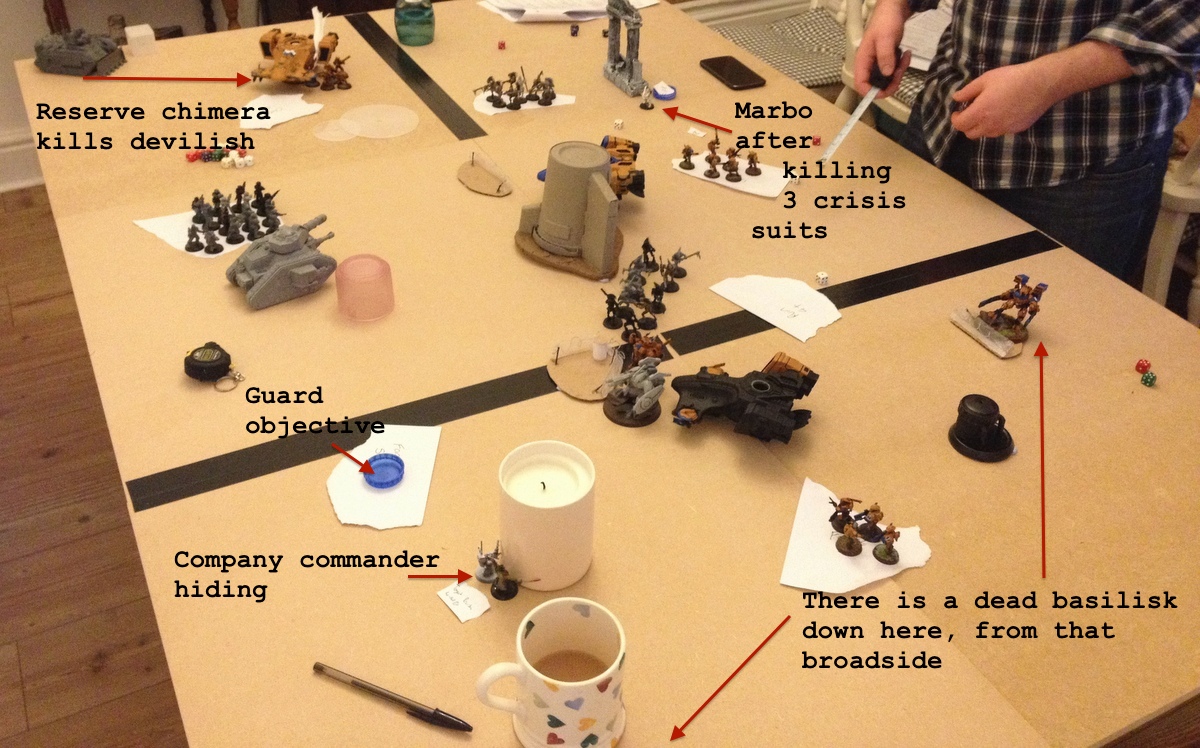
We don’t like this broadside, it destroyed a basilisk
So I lost the basilisk to a heavy railgun shot from a broadside, turn one, one penetrating hit, exploded. At that point it could have been pack away time for me and to the pub. But we must fight on, for the Emperor of course.
Things continued in this manner, lost a few models from both command squads, they passed their leadership tests. Each mortar lost a wound too. This was all rather annoying, especially after gearing up my deployment to go first. My first deployment mistake and learning was giving the artillery I had a good field of view, the mortars had no cover and the basilisk was open to attack from over half of the table. Fine if I had gone first perhaps.
Tau gained First Blood in this turn.
The russ took two hull points of a devilfish and shook the crew, the blob killed two kroot. I will now give none Imperial Guard players an idea of the how the lasgun is supposed to work. First rank fire, second rank fire increases lasgun shots by one, with rapid fire this can go to three shots per lasgun. In a blob of 20 that is a lot of shots, although its not 60 because you loose some lasgun shots to sergeant laspistols. The kroot took around 36 shots from my blob, two died. Sometimes this weight of fire can be amazing, sometimes its not. My mortars scattered off the kroot and missed everything.
Turn 2
Turn 2, Marbo and a chimera arrive causing destruction!
All but one mortar was killed, the last fled off the board. Lesson learnt, placing things next to the board edge means they will probably have no chance to regroup. Around 10 guardsmen from the blob fell to burst cannon fire.
At this point the dirty Tau’s tactic seemed to be come at me and take my objective, showing little regard for their own objective. I was sitting on my objective with my company commander near by and russ near by too. I planned on using my reserves to actually take it. The company cannot, he is a HQ selection.
Marbo arrives! One chimera arrives! Its on! Marbo is amazing, pops up, throws demo charge, rolls a hit, three dead crisis suits. I nearly forgot about the Instant Death rule – where a wound taken from a weapon with a strength double the unit’s toughness kills it outright, regardless of it’s remaining wounds. This I thought was fantastic as the crisis suits all have burst cannons which are Assault 4 – they eat through guardsmen so easily.
The chimera finished off the devilfish which had one hull point left, the fire warriors inside disembarked safely.
The russ did nothing.
Turn 3
Marbo died. Took a total 22 shots though from a unit of kroot and a unit of fire warriors. This was to be expected, but it was worth the loss of Marbo. RIP Marbo. Perhaps another lesson here, people can die in the Imperial Guard for the greater good.
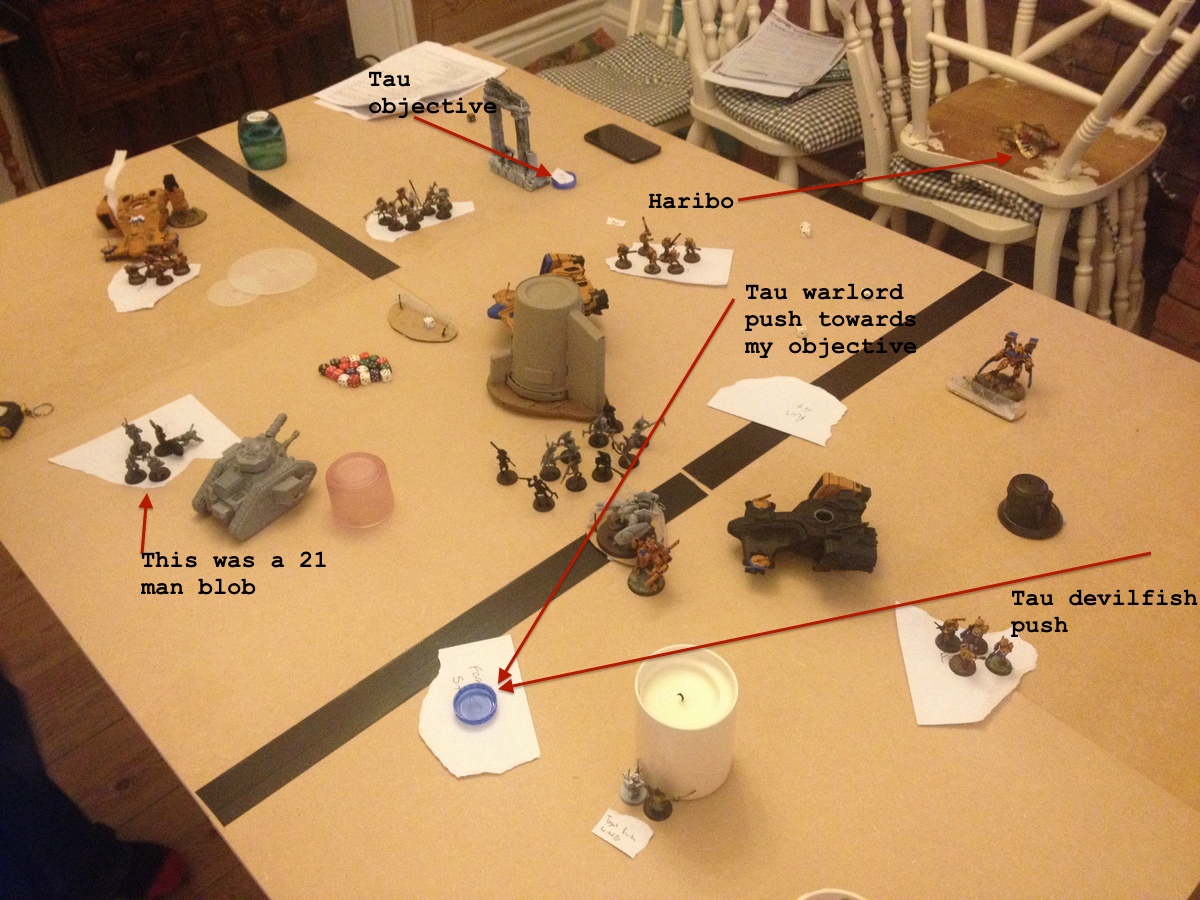
Its only turn 3 and the blob of 21 is down to three, commissar, sergeant and vox. But again this could be a lesson, they died for the greater good. They soaked up so much burst cannon and pulse rifle fire that someone else more important survived; a commander or veterans perhaps? But not the mortars, they were doomed as soon as I placed them in the open.
The russ killed a few kroot and they fell back, not amazing but perhaps allowed me to move up my veterans more easily.
The Tau warlord had a trait that allowed me to take objectives. This meant that the Tau warlord had been moving up the board onto my objective for the previous two turns. He had now arrived and my company commander assaulted him. One bodyguard had already been killed after terrible dangerous terrain tests and the other bodyguard had also taken a wound. The vox in the company command was killed, the commander held in combat and also saved two wounds with his 5+ invulnerability save. Lucky.
Final chimera did not arrive.
Turn 4
Turn 4, Tau push further and the blob is whittled down
The russ had now moved up out of cover to place pressure on the enemy objective. This meant it took a hull point from a rear attack from fire warriors. The kroot fell back again. I lost my final blob sergeant and the commissar – this left a vox. The Tau warlord killed my company commander – Slay the Warlord for Tau.
The last chimera arrived and rolled right up onto my objective to counter the Tau warlord. It then killed the warlord, one bodyguard remained from the Tau command squad – Slay the Warlord for Imperial Guard. The first chimera and veterans that arrived were just pushing back kroot and fire warriors as they moved up towards the enemy deployment zone and their objective.
The russ destroyed a devilfish, about time it earned its points.
The forces were now a mess, spread out and rear fire on vehicles was easy. I think this was because of the Tau rush to my objective and my rush onto theirs, we cartwheeled around each other.
Turn 5
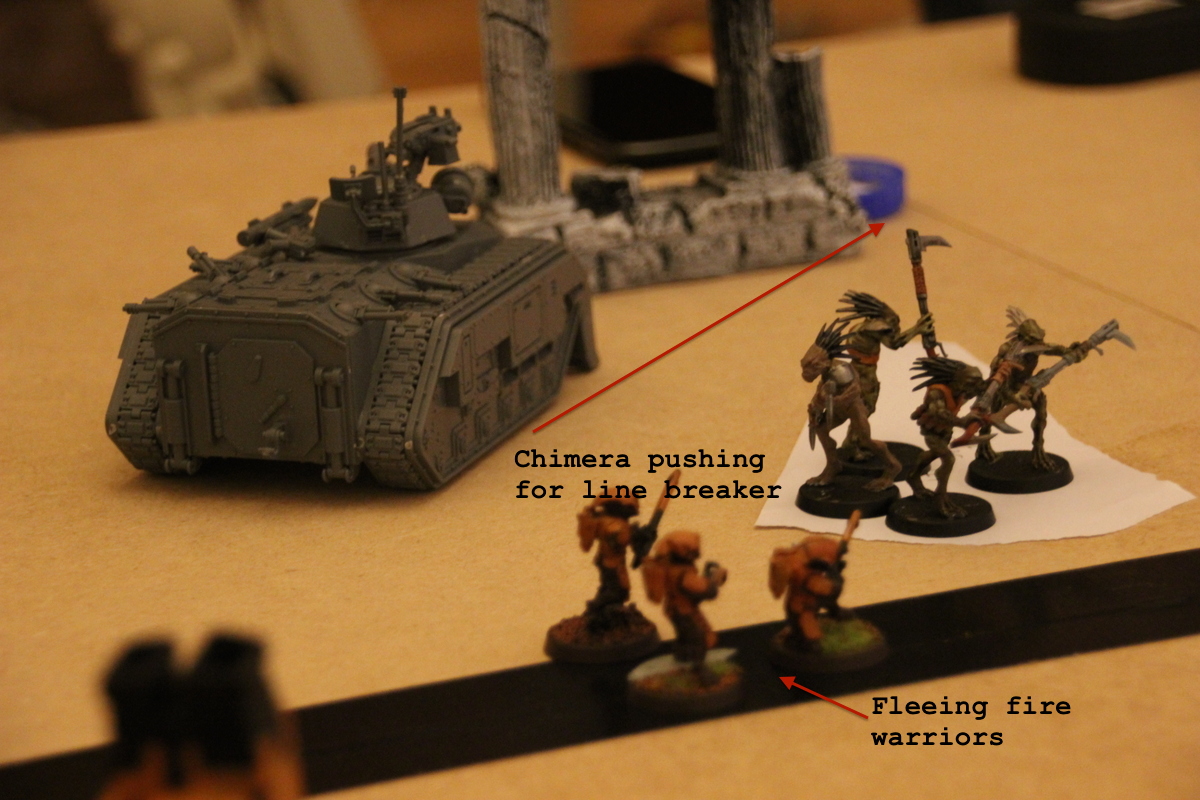
Turn 5, chimera pushing for line breaker
The Tau seemed to be fighting back now after taking some decent losses in turn four. I lost of veterans and one group fled! This was bad as this was the group that was moving onto the enemy objective.
I killed the remaining bodyguard on my objective and took my objective back! Other firing was just at fire warriors and kroot, the Tau were spread out and had neglected their own objective. Fleeing units also meant that they did not have many options to take their own objective.
Things were looking up for the Imperial Guard.
Turn 6
The veterans on my objective were cut to pieces by devilfish burst cannon and drone fire, they fled, off the board. All is lost. My fist veteran squad cannot take their objective as they are too far away after fleeing. The second has now run.
A chimera flamed four kroot which was good as it drove them back away from my objective and meant they couldn’t take the objective in turn 7 – if it arrived. The other chimera moved into the Tau deployment zone – Line Breaker.
Game End – Tau vs Imperial Guard
It was a draw.
Tau: 2 points, slay the warlord and first blood.
Imperial Guard: 2 points, slay the warlord and line break.
Neither of us took any primary objectives for 3 points.
Did we both win. No. The Emperor does not see it like that. We lost.
Summary
So lots of learnings here, PTOF!
My blob should have perhaps been better covered by my russ and held my own objective. This would have given me a solid three points.
One veteran squad could then have been used to disrupt his objective. The other veteran squad could have been used to bolster my own objective or move up to somewhere else on the battlefield.
We won’t talk about the mortars.
Expect more Tau vs Imperial Guard Battle Reports here soon!